Showing posts with label Couture Creations. Show all posts

Saturday, May 24, 2014

Party Time with Couture Creations

Happy Saturday!  I created this Sweet 16 card for one of my daughter's friends using Couture Creations Dreamboat 3-in-1: Party Time Set.   My step-by-step instructions for this card can be found on the Couture Creations Blog.  


Please hop on over to the Couture Creations Blog.  Tell them Kate sent you!


Sunday, May 18, 2014

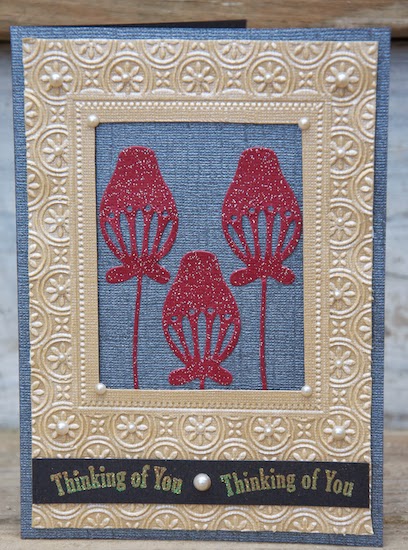
Thinking of You

Hello!  I am super excited to share with you that I am a Guest Designer for Couture Creations this month.  This rich, beautiful sympathy card made with lots of Couture Creations and Core'dinations went live on the Couture Creations Blog yesterday.   


Making this card was an easy task using Couture Creations Cabaret Embossing Folder,  Endless Dreams Decorative Die, Pearls and Foam Mounting Tape. 


To create your card:

1) Start with a 5" x 7" black card base.  


2) Emboss a piece of gold cardstock using Couture Creations Cabaret Embossing Folder and then trim embossed image closely. 


3) Before putting away your Big Shot (or other die cutting/embossing machine), die cut three burgundy flowers out of Couture Creations Endless Dreams Die C0723421.


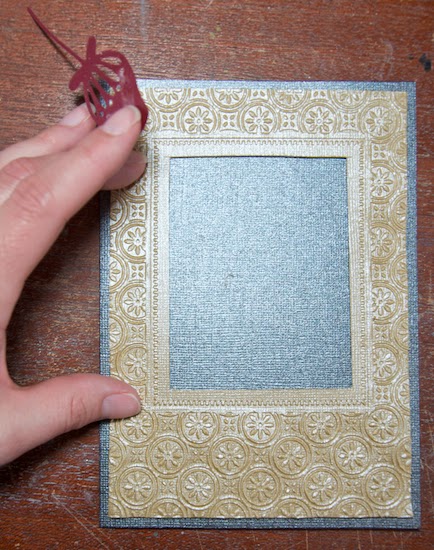
4) Using a craft knife, cut out the non-embossed center of the gold cardstock embossed in Step 2.


5) Flip over embossed cardstock.  Add Mounting Foam Tape to the outside and inside of the frame.  Peel back tape and center on black card base.


6) Glue burgundy flowers at different levels in the center of embossed frame. 


7) Add stamped sentiment 1/2 inch from the bottom of the embossed frame.

8) For a finishing touch, add Couture Creations Pearls to the centers of the embossed circles and in between the stamped sentiments. 

I hope you enjoyed my tutorial today.  I'll be back next week with another one! 

Couture Creations Supplies:
CO723163 Cabaret Embossing Folder, Romantique Collection
C0721985 6mm Foam Mounting Tape
 CO721999 Cafe Creme Pearls
C0723421  Endless Dreams Die 

Sunday, February 23, 2014

Couture Creations Design Team Application Round 2

With a two feet of snow on the ground here in Maine it is hard to believe that Easter is right around the corner.  Oh, how I long for the pretty colors that Easter brings into our lives.  Today I will settle for sharing a bit of the pretty that Easter brings with a card I made for the second round of Couture Creations Design Team Call.


Here are the steps to how I created my pretty Easter card:

1) Create a pink card base that is 4.5"w x 6"h using Core'dinations Brights Collection.
2) Cut a green mat 4.25"w x 5.75"h using Core'dinations Vintage Collection.
3) Cut a purple 4"w x 5.5"h background using Core'dinations Vintage Collection.


4) Emboss the purple background (see Step 3) using Couture Creations Cultivated Embossing Folder.


5) Sand the embossed purple background with Core'dinations Sand It Gadget.  Don't forget to dust it, too!


6) Cover embossed & sanded background with VersaMark. Make sure it is completely covered!
7) Sprinkle clear embossing powder all over the VersaMark.


8) Heat emboss the powdered embossed background.  This adds a lovely sheen and really makes the images from Cultivated stand out.


9) Add Couture Creations Double Sided Tape to the back of both the green mat and purple embossed background.
10) Place the green mat on the pink card base.  Make sure it is evenly spaced from the edges.
11) Place the embossed purple background on top of the green mat.  Again, making sure it is evenly spaced from the edges.

Next we move on to making the pretty doily...

12) Cut a 5"x5" square out of both yellow and green cardstock from Core'dinations Vintage Collection.


13) Cover the entire green 5"x5" square (see Step 12) with Couture Creations Double Sided Tape making sure not to overlap the tape.
14) Trim any over hanging tape from Step 13.


14) Die cut both the taped-up green square and the yellow square using Couture Creations Dazzling Doily. *I ran the green one through twice since it had an extra layer with the tape.


15) Punch out the intricate cuts on the yellow doily.
16) Peel back the tape on the green doily, leaving the intricate cuts still taped. See the picture below if you are unsure.


17) Lay the yellow doily directly over the green doily.
18) Now peel back the tape on the green doily, exposing the sticky.


19) Cover the layered doily with coarse glitter and swipe off any excess.  The intricate cuts will now be filled with the glitter thanks to the double sided tape.
20) Cut a circle out of the middle of the doily.


21) Place Couture Creations Double Sided Tape around the doily, peel back the tape,  and place doily on the embossed purple background leaving 1/5th of the doily hanging over.
22) Trim the 1/5th doily that is hanging over so the doily is flush with the right side of the card.


Now for some simple finishing touches....

22) Die cut a pennant out of the same pink cardstock as the cardbase.
23) Stamp sentiment onto the pink pennant.
24) Tape the stamped pennant in the very bottom of the doily on card, tucking the right side under the doily and the left side on top of the doily.
25) Glue coordinating flowers around the right side of the pennant.
26) Give card to someone for Easter and watch them smile!


Couture Creations Supplies:
Doily Dies Fantasia Collection: Dazling
Cultivated Embossing Folder
Double Sided Tape

Core'dinations Supplies:
Core Essentails Dark Collection 12" x 12"
Vintage Collection 6" x 6"
Sand It Gadget
Dusty Buddy

Other Supplies:
Ranger VersaMark & Archival Ink
Martha Steward Coarse Glitter
Stampendous Pearl Embossing Powder
Gel-A-Tins Stamps
Wishing much luck to those in Round 2 of Couture Creations DT Auditions!!! 

I hope you enjoyed a bit of early Easter! 
~Kate

Sunday, February 16, 2014

Couture Creations 2014 Design Team Audition

Hello, hello!  Today I am sharing several projects I have created using Couture Creations products for their 2014 DT Audition.  For those of you who already follow my blog, you have seen some of these just recently and you already know I love Couture Creations embossing folders, stamps and dies. Their double-sided tape is pretty awesome, too!  

The first two cards I created for CropStop as their January 2014 Guest Designer using Couture Creations 3-in-1 Collection: Butterfly Notes. 


Couture Creations 3 in 1 Collection: Butterfly Notes
Couture Creations All Occasions Collection Embossing Folder: My Gardens
Couture Creations Double-Sided Tape: 18mm x 50m

 You can find a detailed tutorial for my bright "It's Your Day" card here.


Couture Creations 3 in 1 Collection: Butterfly Notes
Couture Creations Double Sided Tape: 18mm x 50 m
Couture Creations Gemstones: Sparkling Champagne

My next card was designed for Core'dinations Cardstock. After embossing the Chocolate Box cardstock with Great Almanzo, I embossed the image with clear embossing powder.  I love how this makes the embossing sheen.   


Couture Creations Great Almanzo Embossing Folder
Couture Creations Dazzling Doily Die

Did you know you can emboss on the back of Sticky Back Canvas?  You sure can! I am not sure I have shared this on my blog before, but it was showcased at CHA 2012. 


Couture Creations Smooch Embossing Folder

I could post a bunch more projects using Couture Creations, but I will end with this card.  It is one of my favorites.  


Couture Creations Peacock Pleasure Embossing Folder

I wish everyone the best of luck! 
~Kate

Wednesday, January 1, 2014

Kicking the New Year off with CropStop!

Happy New Year!  I am so excited to be back with CropStop as their January Guest Designer.  A new year always brings new things, a time of rebirth and growth.  Today I am sharing with you a simple card that embraces this feeling.  


I started with a 4.25" x 5.5" white card base made with Core'dinations Cardstock and embossed the front of the card with Couture Creations Plush Embossing Folder.  These embossing folders are so awesome that even when you dry emboss with them on a white card base the embossed image is so sharp! 


Next, I stamped my sentiments strategically around the embossed image.  To get the two toned image,  I dabbed my sentiment stamp with Momento Ink in Bahama Blue, then I lightly stamped the inked sentiment onto a scrap piece of paper a couple of times (leaving a bit of the blue ink on the stamp) and then dabbed that stamp with some Ranger Archival Ink.  


Couture Creations  Butterfly Notes 3 in 1 Collection was used to make my 3-D butterfly.  This is an awesome limited edition collection that includes matching stamps, dies and embossing folders!  I die-cut two butterflies out of Core'dinations Cardstock using the butterfly die in Butterfly Notes.  Then I stamped one of the butterflies with the butterfly stamp (from this same collection) and the Bahama Blue ink.  I scored the stamped butterfly and then layered it on top of the other die-cut butterfly, making it 3-D.

Wishing you a new year in which you can imagine, dream and fly! 
~Kate

CropStop Supplies: 

Other Supplies:
Unity Stamp Co. 

Thursday, June 27, 2013

Core'dinations & Couture Creations Day 4!

Today I am up on the Core'dinations Blog with Vivian and Tracy for a blog hop with the Couture Creations Blog.  If you have any problems getting on the Core'dinations Blog, pop on over to the Core'dinations Facebook Page, they will be sharing our projects throughout the day.  There are prizes from both Core'dinations and Couture Creations so you'll want to visit each company!


The card I am sharing for today's hop is the card I made for my Mom's birthday, which was last week.  I love making pretty birthday cards for my Mom. She truly appreciates what is made by hand.  Of course, she is a crafter herself.   Combining Core'dinations Cardstock and Couture Creations embossing folders & doily die were just what I need to make her a pretty card for this year's birthday.


Step-by-step instructions for this card can be found on the Core'dinations Blog. I really enjoyed using Couture Creations products with Core'dinations Cardstock!  The embossing folders are really crisp and the embossing really stands out on all the Core'dinations Cardstock.  The doily die is incredibly intricate, yet it cut through the hearty Core'dinations Cardstock like butter.  I look forward to playing with these product again!  

Core'dinations Supplies:
4.25"x5.5" Chocolate Box Collection
12"x12" Neutrals Collection
6"x6" Vintage Collection
Sandit Gadget
Dust Buddy

Other Supplies:
Couture Creations Great Almanzo Embossing Folder
Couture Creations Dazzling Doily Die
Helmar Zapdot & Premium Craft Glue
CM Circle Cutting System
PaperTrey Ink Stamp
Stampendous Embossing Powders
Kaiser Craft Pearls


Thursday, February 7, 2013

CHA Projects 1

If you were at CHA in Anaheim last month you might have seen some of my designs.
I was asked to design 8 cards, 1 altered, and 1 layout by CSW Distributors using 
Couture Creations "Fresh & Fun"Embossing Folders*. 

(photo credit Cheryl Boglioli) 

Today I am sharing some of the cards shown in the display above.  
Each card uses Core'dinations Cardstock in addition to the Couture Creations Embossing Folders.


To create the fun embossing image in "Bursting With Pride" I embossed a piece of Core'dinations Cardstock with Powder Puff embossing folder.  I heat embossed glimmery embossing powder to make it sparkle and then lightly sanded the raised embossed images. 


Debossing was used to create the fun imagery in "A Little Birdie Told Me..." 
 I used the Extra Flint embossing folder with grey Archival Ink to deboss. 
Doesn't this embossing folder  have a bit of retro feel to it?  


I embossed these Maya Road chipboard butterflies with the Almanzo embossing folder.
Once embossed, the butterflies were misted with Tattered Angel's Glimmer Mist and the embossed image was swiped with Momento Ink in a darker shade than the mist.  


Petal Pleasures and Fudge embossing folders were used to simply emboss for "Happy Birthday."
I did sand down the embossed image, just a touch, to have the shades of grey show.  

I hope you enjoyed these embossed creations.
I promise to post some more of them in the next couple of days!


*All of the embossing folders I used in today's post can be pre-ordered at CropStop. 
CropStop is the only distributor for Couture Creations Embossing Folders in the U.S.