Showing posts with label christmas. Show all posts

Thursday, December 12, 2013

Oh Christmas Tree!

Tis the season for creative cardmaking!  It is such a busy time of year, yet so many of us want to put our own creative twist on gift giving.

Today I am sharing a cute Christmas gift card holder made with Quick Quotes Pattern Perfect Back to School Collection.  Yes, I did say back to school.  The book prints of Pattern Perfect 800 make a wonderful Christmas tree!


I fussy cut out the books, inked the edges with Quick Quotes Midnight Cofessions Chalking Ink, then glued down the inked books to create this layered Christmas tree.  Even the star and tree stump is fussy cut from paper in the Pattern Perfect collection. I stamped the holiday sentiments using the Midnight Cofessions Chalking Ink, too. 


The book print was just perfect for decorating the card since I am giving a book store gift certificate.  

Don't forget about Quick Quotes Friday Challenge 34!   Since the challenge is to create a holiday card I will be posting this card to the challenge. Why don't you join me?  


Other Supplies:
Core'dinations Cardstock
Gelatins Stamps
Xyron & Helmar Adhesives

Wishing you a happy and healthy holiday season!
Kate

Wednesday, December 11, 2013

Christmas Cuteness

Nothing is cuter than a baby at Christmas time!  My grandson's are no exception to that thought.  This year I can not wait to get some fun pictures of Seth at his first Christmas.  With that in mind, I am sharing a layout of Chase's first Christmas.  Don't you just want to pinch those cheeks?  


This layout is chock-full of Core'dinations Tim Holtz Kraft-Core Shattered Collection.  I tore it, I sanded it, I die-cut it,  I inked it, and I even used the kraft-core back side of it.  This collection is so versatile and fun!

Wishing you lots of Christmas cuteness this year!

Wednesday, November 27, 2013

Fast & Fun Christmas Tags

It is almost that time, the time of year I love and believe goes by way too quickly.  Christmas!  I always have grand plans of making lots of wonderful Christmas paper projects and then always decide that I need to slow down and enjoy the season instead of filling it with expectations I know will stress me out.  Believe me, this is every year! 

So instead, I create projects like the fun gift tags I am sharing today. They spruce up a special gift without taking too much time.  Each of these took no more than 10 minutes.  Don't you love projects like that? 


Each of these tags are made with a different Core'dinations tag.  Check out my supply list below for links to each one.  The textured Core Tags are great for embossing and layering!


I love the Smooth Creative Tags for stamping!  You can see how crisp my stamped images are on the tag above and below.


Do you add homemade tags to your holiday gifts?  Leave me a comment here or on my Facebook Fan page by noon EST this Sunday 12/1 and I'll pick a random commenter to win these homemade tags!  

Supplies:

Stampin' Up Stamps
Gel-A-Tins Stamps
Sizzix Dies & Embosssing Folder
EKSucess Border Punch
Ranger Archival Ink & Stickles
Queen & Co Bling

Friday, July 19, 2013

Christmas Card In July


Last week I was trying to finish up a summer layout and I was struggling to put the finishing touches on it.  My creativity was leaning me towards creating this great Santa card using the Groovy Santa Collection by Gel-A-Tins Stamps.  I wish motivation to make Christmas cards actually struck me when I need to make them. Sometimes I think that my creativity is seasonally challenged.  


I think this Santa stamp looks like he is saying "Ho, Ho, Ho."  Don't you?  I stamped the image and sentiment on a Core'dinations CoreTag after I had spritzed it with some Chalkboard Mist.

While I am definitely not wishing for Christmas anytime, I am happy to see that my Christmas card making mojo is still intact and hope that you enjoyed this bit of Christmas in July.

~Kate

Supplies:
Gel-A-Tins Groovy Santa Collection
Core'dinations Cardstock and Core'Tag
Ranger Archival Ink
Tattered Angels Chalkboard Mist
May Arts Ribbon
Xyron Mega Runner

Monday, April 8, 2013

Christmas Bounce!

I am not already thinking about Christmas.  I promise! 
Today I am sharing a 2-page Christmas layout. 


This layout has been sitting on my desk unfinished for a few months. 
Why?  2-pagers are really not my "thing."  
I struggle with them, but find I do 2-page spreads for many of my Christmas layouts.  


These pics are from Christmas 2011.  The girls got a Bop It Bounce. 
They had a blast playing with it!  


Supplies:
Cardstock ~ Bazzill
Paper ~ October Afternoon (I think)
Tags ~ Elle's Studio
Alphas ~ American Crafts
Glue ~ Helmar Premium Craft Glue & ZapDots

Friday, December 21, 2012

All Is Calm, All Is Bright

All IS calm.  I love calm. 
I'd love to say that all is bright today, but it is a miserable rainy & windy day here in Maine. 
I am still holding out for a white Christmas though! 


My latest holiday card was inspired by the "all is calm, all is bright" epoxy sticker I found in my stash.
Not sure who manufactured it, but I do believe it is lovely! 

I created the A2 card base using Papertrey Ink kraft cardstock I embossed using the Trendy Diamond Embossing Folder by Cart-Us.  Then I placed some very cool Dearest Jane Paper by Papertrey Ink on the bottom 2/3 of my card base and added a strip of October Afternoon ribbon.  The bird cage was cut out of Core'dinations glitter cardstock using the Tim Holtz large bird cage die.  I just love this glitter cardstock! I added the epoxy sticker and flowers to finish off the card. 

Are you all done making Christmas cards?


Wednesday, December 19, 2012

Decked Out Gingerbread House Card

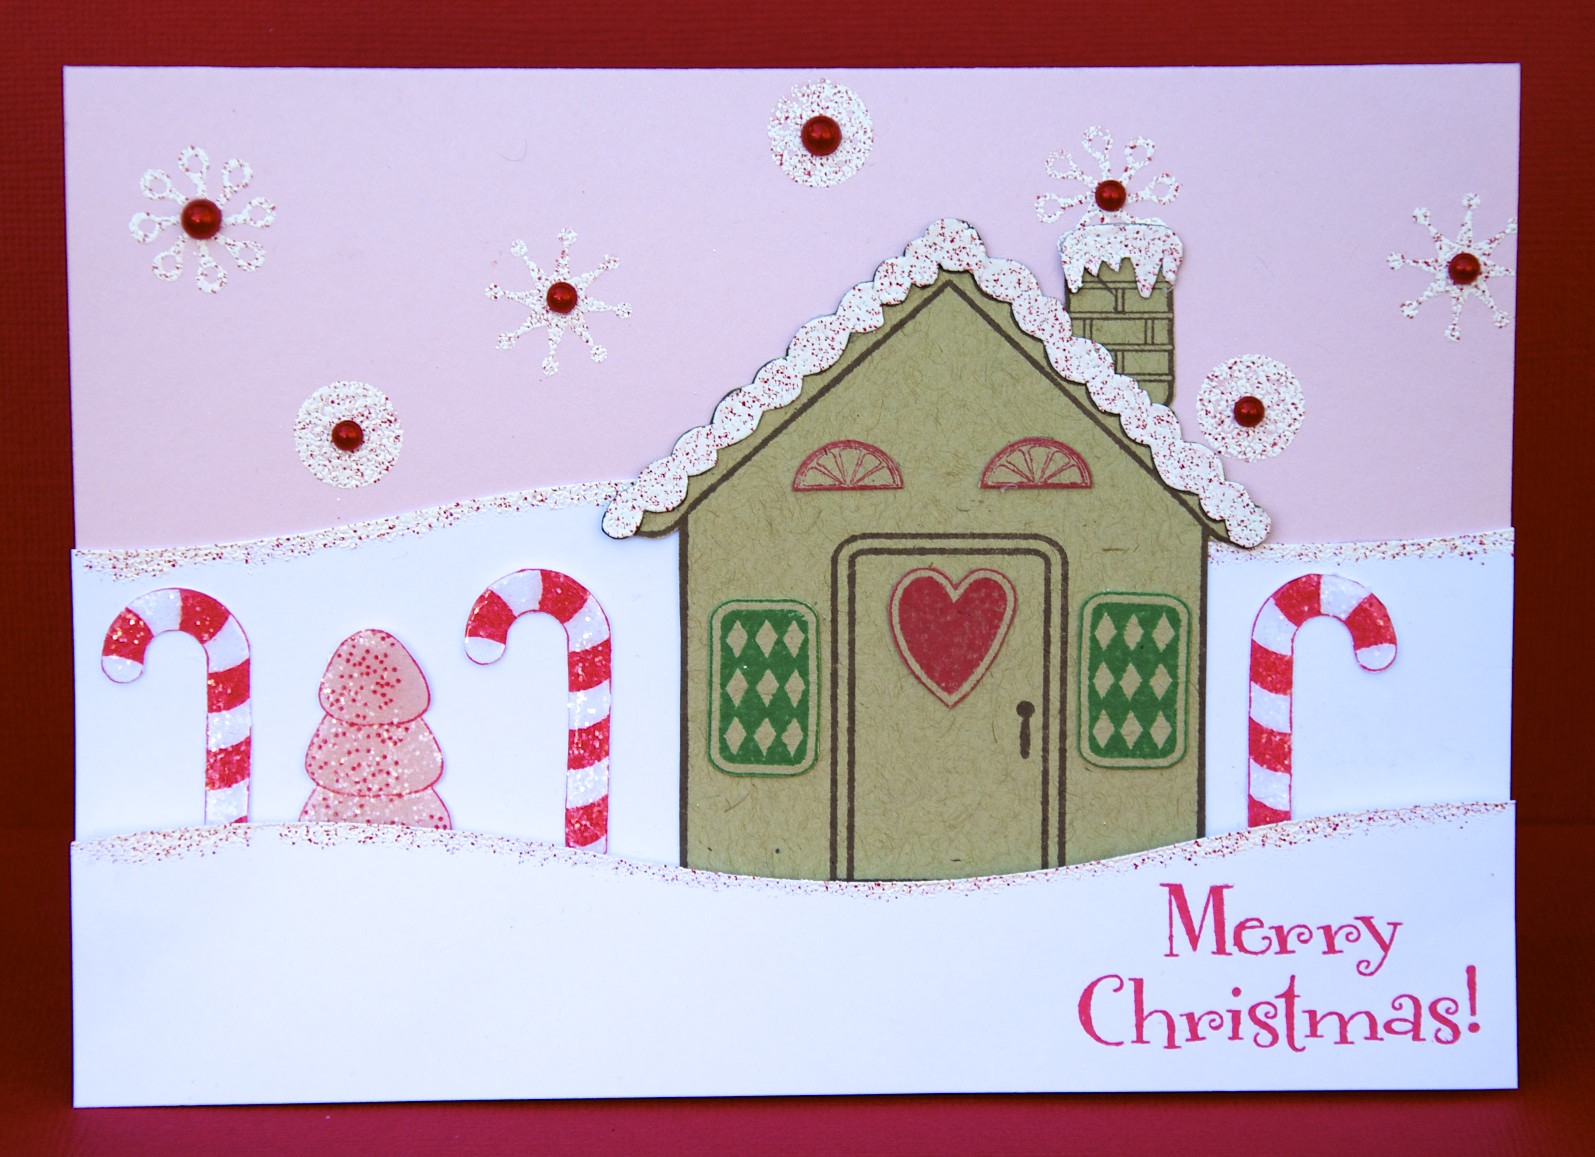
Yesterday was my day to post on the Gel-a-tins Stamp Blog.  I shared one of my favorite holiday cards I have made so far this season. The Gingerbread House Collection is so perfectly festive!   


I heat embossed “Santa’s Candy Cane” Gelly Powder on the top of my snow hills to give them dimension. I stamped and heat embossed the snowflakes. I also stamped the gingerbread house twice so I could fussy cut and layer the snowy roof and chimney. Both were heat embossed with the Gelly Powder.  


For windows and doors I stamped the candy accents, fussy-cut the stamped images and then adhered them to the house.  I embellished the stamped candy canes and gumdrops with Crystal Effects and glitter.  


Gel-å-Tins Supplies:
Gingerbread House Collection
Groovy Santa Collection 
Santa’s Candy Cane Scented Gelly Powder

Other Supplies:
PaperTrey Ink Cardstock
Queen & Co Pearls

I've got another idea brewing for the Gingerbread House Collection and hopefully will have time to create it and share before Christmas is upon us!

(Forgive the change in font/size halfway through the post. Blogger is having some fun with my fonts today!)

Sunday, December 16, 2012

Quick Holiday Cards

Something about this season inspires my creativity.  Could be all the family filled activites, the smiles abound, the pretty decorations, or all of the afore mentioned.  I have been a card making fiend the last two days. I'm sharing four of them with you today.


I am submitting my snowman card to the Christmas Love Campaign.  The campaign encourages us to create something special and share it with anyone!  I am sharing my card with a friend who is having a bit of a rough time this holiday season. She always had a wealth of kind words and support for me, so this is my time to give back to her.   Unity stamp is making a $3 donation from the sales of  "One Of A Kind Winter" stamps (snowman & sentiment) towards the Christmas Love Campaign.

My stamped snowman was created using markers.  I used some whimsical colors to dress him up.  The snowflakes and sentiment are stamped in Ranger Ink.


This simply made washi tree Christmas card is make with Unity's "A Little Bit Washi" stamps set by Susan K. Weckesser and Ranger Ink.  I started by stamping the largest washi tape stamp at the bottom working my way up the tree by size. The tree trunk is just one of the washi stamps turned sideways. 


This simple Santa card just puts a smile on my face. Partly because I love the vintage santa images and partly because it came together in less than 5 minutes.  Who doesn't love a cute card that whips up quickly?

I punched three 1/5" circles and three 1" circles out of the same kraft cardstock as the card base.  I stamped the Groovy Santas (Gel-a-tins Stamps) on the larger circles and matching "ho, ho, ho" sentiments on the smaller circles.  The stamped circles are given a bit of height with Helmar ZapDots.


I used the layered tag made for the Core'dination's crop a few weeks ago as the inspiration piece for this card.  Just adding a little bit of pink distressed cardstock and a stamped sentiment with this tag made for a sweet feminine holiday card.

Have you been making holiday cards?  Please share a link any you have made with me in my comments.  I'd like to visit your blog and give some holiday love!

Thursday, December 13, 2012

My December Daily

At the beginning of December I decided that I would jump on the December Daily bandwagon.  With no intentions of feeling bad if I didn't get to a day, I set out to create my cover.

(2012 December Daily Cover)

I started the cover of my December Daily album by cutting out a 4"x 6"piece of cardboard box.  I pulled off the top layers to show the corrugated part and then inked it with Vintage Photo Distress Ink.   The cover is then decorated with Authenique's "Festive."   Deciding that 4" x 6" wasn't going to be big enough, I attached the decorated cardboard to a 5" x 7" piece of cream colored cardstock and rounded the outside edges.

(2012 December Daily - Days 1 through 4)

As I got into making my pages each day, I just did want came to me.  Not all my pages will be the same size or match side-by-side. Some days will reflect what we did that day or a holiday tradition or just something random and fun.  Some days will have pictures, some days won't.  Some of the pictures will be fantastic and some will be fuzzy because they are from my phone.  What I will do on every page of my 2012 December Daily is hand journal a note.

Supplies:
Cardstock ~ Papertrey Ink
Patterened Paper, Stickers, Tags ~ Authentique Paper
Glue ~ Helmar Quick Dry Adhesive

Are you doing a December Daily project?  If you are, I would love to see it!  Please be sure to share a link in the comments.

Saturday, December 8, 2012

Feminine & Festive!

Quite often I find that my holiday cards are unisex.  Stepping out of my self-induced holiday card mode, I created a festive and feminine card for my first project on the Gel-a-tins Blog.    


I heat embossed the fun candy stamp images (Gingerbread House Collection) that decorate the dressform and the chipboard snowflakes with Gel-a-tin's "Santa Candy Cane" Scented Gelly Powder.  It really does smell like candy canes!  This speckled pink Gelly Powder really pops when you heat emboss it.


The dress and snowflakes are accented with Studded Gelly Gems Roll-Ups. I cut a small strip for the dress belt and cut individual silver studs for the other accents. They were so easy to cut and use! 

Here are some basic instructions on how to create this card:
~ Create a 4"x8" card base.
~ Cut & adhere a 3.75" x 7.75" piece of patterned paper.
~ Spritz dressform w/ mist, allow to dry thoroughly.
~ Stamp images onto dressform with VersaMark, heat emboss with Gelly Powder.
~ Completely cover chipboard with VersaMark, heat emboss with Gelly Powder.
~ Stamp sentiment onto envelope.
~ Adhere doilie to card base,  1/4 from the bottom & right side.  Trim excess doilie on right side.
~ Adhere Gelly Gems as accents on the dress form and chipboard with Helmar Premium Craft Glue.
~ Ahere decorated dressform, stamped envelope and chipboard snowflakes.
~ Share with a friend. 

I hope I have inspired you to create a festive and feminine card today!  

Gel-å-Tins (http://gelatinstamps.com) Supplies:
Gingerbread House Collection
Groovy Santa Collection (sentiment)
Santa’s Candy Cane Scented Gelly Powder
Studded Gelly Gem Roll-ups

Other Supplies:
Bazzill Cardstock
Pink Paislee Paper
Basically Bare Dress Form
Tattered Angels Mist
Memento Ink
Jenny Bowlin Envelope
Helmar Glues 

Sunday, November 25, 2012

Hard Core {Holiday} Crop

I decided to join in Core'dinations Hard Core {Holiday} Crop this weekend.  Lucky for me I have a slew of Core'dinations cardstock!  Core'dinations is having a ton of fun, easy challenges with lots of fantastic inspiration from their design team and other participating partners.


For "Road Trip" I used Lydia's Sketch Challenge.  It was just perfect for my people Instagram photos from our NYC trip this summer. All the cardstock, even the glitter cardstock, is from Core'dinations.

 
Cards do not have to be overly embellished to be pretty, as you can see in the card I made for Debbie's Ribbon Challenge.


The embossed angel in "Joy" is actually debossed in Core'dinations Cardstock.  I accented the debossed image by swiping it with white ink and fussy cutting around the angel.  Ribbon was used for the angel's belt.

This is all I have time to share right now.  I'll have three more Core'dinations filled projects to share with you tomorrow all done for the Hard Core {Holiday} Crop!

Saturday, November 3, 2012

Home For The Holidays Blog Hop

Hi!  I hope you are visiting for the "Home For The Holidays Blog Hop!" My name is Kate. I am a Helmar Educator. The Helmar Team has teamed up with The Robin's Nest Design Team to bring you lots of great holiday ideas.  Be sure to blog hop and leave a comment on each team member's blog listed at the bottom of this post for chances to win gifts certificates to Helmar and The Robin's Nest.  
    
Today I am sharing with you a cute and easy-to-create Thanksgiving and Christmas decoration using both Helmar and Robins Nest products.  Using a frame I found for $2 at a local salvage store, I created an interchangeable holiday decoration.

"Thankful" for Thanksgiving:

"Merry & Bright" for Christmas:

Helmar Supplies: 
The Robin's Nest Supplies:

Don't forget to leave a comment on my blog for a chance to win a $10 gift certificate to Helmar and a chance at the grand prize drawing!  Have fun hopping!