Showing posts with label card. Show all posts

Wednesday, September 24, 2014

Sequins, Stencils and Splatters!

A couple of weeks ago I shared the first card I made using stencils and splatters together. Feeling like I could really design many different cards using the same concept, I made two more birthday cards with sequins and paint splatters.  Sequins were just the perfect touch for finishing off both cards!


I mixed modeling paste with Distress Paint to create the textured base to use with the stencil in this first card.  This mixture dries quickly. I then splattered Distress Paints by spraying a small amount of the paint off of a paint brush.  Random placement of sequins gave this card just the perfect touch of bling. 

Supplies:
Core'dinations 110lb Smooth Cardstock
The Crafter's Workshop "Specimens" Stencil
Dick Blick Molding Paste
Tim Holtz Distress Paints & Archival Ink by Ranger
PaperTrey Ink Stamp
Misc Sequins

My next card was total trial and error, but oh so fun to make!  I must have thrown away three stenciled pieces before I got the feel I wanted.


To create the pie chart, I heavily covered a piece of Core'dinations 110lb Smooth Cardstock with two different colored mists.  I then used Inka Gold Metallic Rub with the stencil over the misted cardstock.  This Metallic Rub is the bomb!  Totally dries without rubbing off.  The sentiment is stamped and heat embossed onto a piece of Core'dinations Vellum. Did you know they have vellum now?  

Supplies:
Core'dinations 110lb Smooth Cardstock & Vellum
The Crafter's Workshop Pie Chart Stencil
Tattered Angels Mists
Viva Decor Gold Metallic Rub
PaperTrey Ink Stamps
Ranger Embossing Powder
Misc Sequins

Monday, August 4, 2014

Friendship Makes Life Colorful

National Friendship Day is the perfect excuse to make a cute card for a friend!  I was able to make this cute friend card in a snap with Core'dinations Cardstock.  


1) The white card base is 4.5" x 6" of Core'dinations Neutral "Snowflake with the top right and bottom left corners rounded. 
2) I embossed the Core'dinations Whitewash background (4.25" x 5.75") with a Couture Creations Embossing Folder.  
3) The embossed piece was then sanded with Core'dinations Sand It Gadget and dusted with the Dust Buddy to let the blue core show through.


4) I printed my sentiment on Core'dinations Smooth Oval Tags.***

***Tip: When using CoreTags in your printer you are best to print the sentiment out on a piece of paper first to make sure that your sentiment will fit on your tag.  I then attach my CoreTag with semi-permanant adhesive over the already printed sentiment and print the sentiment again.  Always perfect placement when done this way! 

5) Colorful ribbon was then added to the printed tag was glued with ZapDots 1/3 up from the bottom of the card. 

6) The colorful die cut buttons are made from scraps of Core'dinations Cardstock.  Once cut, I ran them through my Xyron X Sticker Maker and sanded/dusted them before adding them to the embossed circles.  


7)  Give the card to a friend and you are sure to make him/her smile!  

Core'dinations Supplies:
Misc. Core'dinations scraps

Other Supplies:
Couture Creations Embossing Folder
Papertrey Ink Button Dies
EK Success Corner Rounder
Xyron Sticker Maker
Helmar ZapDots

Thursday, July 17, 2014

Busy As A Beaver Birthday Card

I am sure you are never late sending a birthday card, but I am!  My sister is the lucky recipient of this fun belated birthday card made with Core'dinations Tim Holtz Kraft-Core Nostalgic and Shattered Collections.  


To create this card:
1) Emboss a 4.25"x 5.5" card base made with Core'dinations Kraft-Core Nostalgic No. 15.
2) Sand embossed cardbase with Sand It Gadget and dust with Dust Buddy.
3) Round bottom corners of card base with corner rounder punch.
3) Cut a 4.25" x 1" and 4.25" x 2.5" of Core'dinations Kraft-Core Shattered No. 20s, corner rounding the 1" piece.
4) Using the backside of the 2.5" piece you cut in step 3 (Kraft side), stamp your sentiment on the right lower side of this piece.  
5) Glue down the stamped Kraft piece and the 1" piece (with the Shattered side showing) 1/2 inch from bottom of card).


5) Stamp the critter image two times, once on Core'dinations Kraft-Core Nostalgic No. 23 and once on Kraft-Core Shattered No. 20s. Stamp the tree stump onto the Kraft-Core Nostalgic No. 23. ***

***Tip: Be sure to sand & dust both of these pieces before stamping your image.  By sanding and dusting before stamping, you get a sharper image and keep dust particles off of the stamp.

6) Fussy cut out both images stamped on the Kraft-Core Nostalgic No. 23.
7) Cut out the tail, belly and nose from the critter image stamped on the Shattered No. 20s and layer onto the critter image you cut out in Step 7.
8) Using double-sided foam tape, adhere the tree trunk and critter to the right side of the card, next to the stamped sentiment.
9) Give to someone.  It will certainly make them smile!

Core'dinations Supplies:

Other Supplies:
Darcie's Heart & Home Rubber Stamps
Spellbinders Embossing Folder
Ranger Archival Ink
WRMK Crop-A-Dile

Wednesday, July 16, 2014

Welcome Little Squirt Card

Core'dinations has a sea of colored-core cardstock to create the perfect ocean scene for any card or layout!  Today I am sharing an ocean themed baby card made with Core'dinations Graphic 45 Lights and Tim Holtz & Ranger Adirondack Collection. 


Core'dinations Supplies:

Other Supplies:
Darcie's Haert & Home Rubber STamps
Scor-Pal
Ranger Versa Mark & Archival Ink & Super Fine Embossing Powder


Stamping on Core'dinations Cardstock is so fantastic because you get a sharp image and texture!  


Technique Tip:  When heat embossing with clear embossing powder on Core'dinations Cardstock, be sure to sand and dust the cardstock before stamping the image with Versa Mark.  This allows for the colored core to show through clear embossing.  I did this on the waves and I love that it gives different hues to the waves, just like you would see at the ocean! 

Sunday, June 15, 2014

Batman Birthday Card

A few weeks ago our spunky grandson, Chase, turned three.  We threw him a Batman themed birthday party.  While I didn't get any pics of the decorations this time around (mainly because I didn't make them), I did remember to take a photo of the Batman birthday card I did make him.  


I designed a cool night sky scene for the card.  The night sky is Core'dinations Core Couture Glitter. 


The skyline was cut from my Silhoutte.  I layered the buildings three high to give it the look as if you were looking onto a city.  The bat was also cut from my Silhoutte and popped up with some foam tape.  

Supplies:
Core'dinations Cardstsock: Neutrals and Core Couture Glitter
Silhoutte "city buildings" and "bat" cut files
Dymo 
 Couture Creations Foam Tape

Saturday, May 24, 2014

Party Time with Couture Creations

Happy Saturday!  I created this Sweet 16 card for one of my daughter's friends using Couture Creations Dreamboat 3-in-1: Party Time Set.   My step-by-step instructions for this card can be found on the Couture Creations Blog.  


Please hop on over to the Couture Creations Blog.  Tell them Kate sent you!


Tuesday, May 20, 2014

Thank You, Teacher!

Getting ready for the end of the school year means thanking those who have spent the year inspiring our little ones to learn.  Today I am sharing a gift bag and card made with a variety Core'dinations Cardstock that I hope inspires you to thank a teacher.  


I decorated a simple kraft gift bag from Darice by creating a base designed to look similar to a chalk board.  The same base design was used for the thank you card. 


The giant cardstock pencils on both the bag and card were scored, sanded and bent to give it the 3-D effect of a real pencil.  


Core'dinations Cardstock:

Other Supplies:
Darice Kraft Gift Bag
Score Pal

Sunday, May 18, 2014

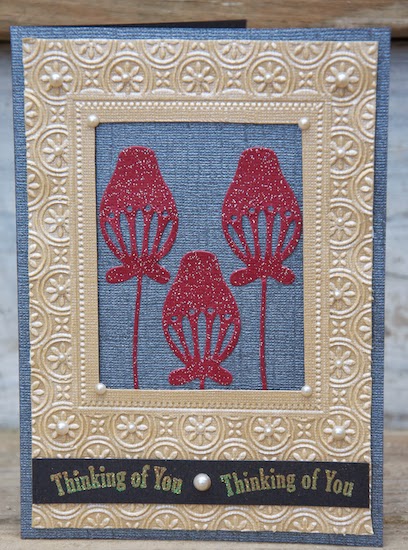
Thinking of You

Hello!  I am super excited to share with you that I am a Guest Designer for Couture Creations this month.  This rich, beautiful sympathy card made with lots of Couture Creations and Core'dinations went live on the Couture Creations Blog yesterday.   


Making this card was an easy task using Couture Creations Cabaret Embossing Folder,  Endless Dreams Decorative Die, Pearls and Foam Mounting Tape. 


To create your card:

1) Start with a 5" x 7" black card base.  


2) Emboss a piece of gold cardstock using Couture Creations Cabaret Embossing Folder and then trim embossed image closely. 


3) Before putting away your Big Shot (or other die cutting/embossing machine), die cut three burgundy flowers out of Couture Creations Endless Dreams Die C0723421.


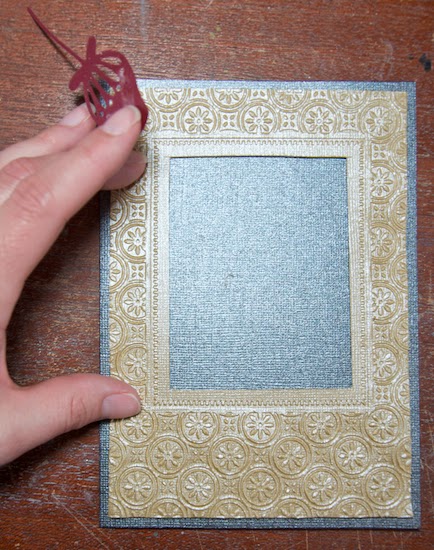
4) Using a craft knife, cut out the non-embossed center of the gold cardstock embossed in Step 2.


5) Flip over embossed cardstock.  Add Mounting Foam Tape to the outside and inside of the frame.  Peel back tape and center on black card base.


6) Glue burgundy flowers at different levels in the center of embossed frame. 


7) Add stamped sentiment 1/2 inch from the bottom of the embossed frame.

8) For a finishing touch, add Couture Creations Pearls to the centers of the embossed circles and in between the stamped sentiments. 

I hope you enjoyed my tutorial today.  I'll be back next week with another one! 

Couture Creations Supplies:
CO723163 Cabaret Embossing Folder, Romantique Collection
C0721985 6mm Foam Mounting Tape
 CO721999 Cafe Creme Pearls
C0723421  Endless Dreams Die 

Friday, April 4, 2014

Ahhhh, Nuts!

TGIF! I am away at a crop this weekend and was so happy there was a scrapbook store for us to shop. My LSS have slowly disappeared so it is nice to see new (to me) products in person.

Today I discovered Darcie's Heart & Home stamps. I HAD to purchase the Busy Beaver clear stamp set because it is so very cute and punny (= funny + pun). Here is the card I just whipped up with it...


You can see a bit of my crop space and the pic was snapped with my phone, but I know that doesn't distract from the total cuteness of the stamps I used!!!

Supplies:
Core'dinations Cardstock  Tim Holtz Kraft Core 
Darcie's Heart & Home Stamps 
Ranger Archival Ink 
Eyelet Outlet Acorn Brads  

Sunday, March 30, 2014

Cupcake Inpirations Challenge

Core'dinations is sponsoring this week's challenge at Cupcake Inspirations.  Have you seen this fun challenge site?  They share a lovely picture of cupcakes each week as inspiration for you to create a card or other project.

This week's cupcake inspiration....


I created a pretty card inspired by the colors and dollops of frosting on the cupcakes.  You can see my "dollops" of Liquid Pearls on my banner and bicycle wheels.  


Core'dinations Supplies:
Other Supplies:
Sizzix/Hero Arts Framelits
Ranger Liquid Pearls & Archival Ink
Die-namics Die


You can find Cupcake Inspiration Rules here.  Be sure to follow the rules, you don't want to miss out on the great Core'dinations Prize for this challenge.  Also, other Core'dinations Design Team members participated in this fun challenge.  Check out the Core'dinations Blog over the next couple of days to see what they created for this challenge! 

Friday, March 21, 2014

Just My Type

TGIF!  22 years ago today Scott & I were wed by a Justice of the Peace surrounded by our family and close friends.  We now have 2 daughters, 2 grandsons, 2 dogs.  We have moved 6 times, finally finding home in a small town in Maine.  We have grown in our relationship, our careers and our age.  After 22 years we are settled in.  It is a nice feeling. 


I am not the sappy type,  just can't do it.  It is no surprise that I made Scott this fun Anniversary card. He totally appreciated it and chuckled at the "type."


Card Supplies:
Core'dinations Cardstock
October Afternoon Paper
Pink Paislee Tags
Cosmo Cricket Alphas (these are old!)
American Crafts Ampersands
Studio Calico Chipboard
Stampendous Embossing Powder

Happy 22nd Anniversary, Scott!!!  
Love ya, Kate

Monday, March 10, 2014

Seth is ONE!

Happy Monday!  This past weekend we celebrated my Grandson's first birthday.  It is hard to believe that our sweet, smiley Seth is already one!


I snapped a few photos of him before the chaos of the party.  This one is my fave!  He is just the smiliest little boy.


I whipped this card up for Seth (before Kass came up with a Mickey Mouse theme).  Nothing overly complicated, just a base made with Core'dinations and lots of October Afternoon embellishments.

I did whip up some Mickey themed decorations, but that will be another post. :)
~Kate


Sunday, February 23, 2014

Couture Creations Design Team Application Round 2

With a two feet of snow on the ground here in Maine it is hard to believe that Easter is right around the corner.  Oh, how I long for the pretty colors that Easter brings into our lives.  Today I will settle for sharing a bit of the pretty that Easter brings with a card I made for the second round of Couture Creations Design Team Call.


Here are the steps to how I created my pretty Easter card:

1) Create a pink card base that is 4.5"w x 6"h using Core'dinations Brights Collection.
2) Cut a green mat 4.25"w x 5.75"h using Core'dinations Vintage Collection.
3) Cut a purple 4"w x 5.5"h background using Core'dinations Vintage Collection.


4) Emboss the purple background (see Step 3) using Couture Creations Cultivated Embossing Folder.


5) Sand the embossed purple background with Core'dinations Sand It Gadget.  Don't forget to dust it, too!


6) Cover embossed & sanded background with VersaMark. Make sure it is completely covered!
7) Sprinkle clear embossing powder all over the VersaMark.


8) Heat emboss the powdered embossed background.  This adds a lovely sheen and really makes the images from Cultivated stand out.


9) Add Couture Creations Double Sided Tape to the back of both the green mat and purple embossed background.
10) Place the green mat on the pink card base.  Make sure it is evenly spaced from the edges.
11) Place the embossed purple background on top of the green mat.  Again, making sure it is evenly spaced from the edges.

Next we move on to making the pretty doily...

12) Cut a 5"x5" square out of both yellow and green cardstock from Core'dinations Vintage Collection.


13) Cover the entire green 5"x5" square (see Step 12) with Couture Creations Double Sided Tape making sure not to overlap the tape.
14) Trim any over hanging tape from Step 13.


14) Die cut both the taped-up green square and the yellow square using Couture Creations Dazzling Doily. *I ran the green one through twice since it had an extra layer with the tape.


15) Punch out the intricate cuts on the yellow doily.
16) Peel back the tape on the green doily, leaving the intricate cuts still taped. See the picture below if you are unsure.


17) Lay the yellow doily directly over the green doily.
18) Now peel back the tape on the green doily, exposing the sticky.


19) Cover the layered doily with coarse glitter and swipe off any excess.  The intricate cuts will now be filled with the glitter thanks to the double sided tape.
20) Cut a circle out of the middle of the doily.


21) Place Couture Creations Double Sided Tape around the doily, peel back the tape,  and place doily on the embossed purple background leaving 1/5th of the doily hanging over.
22) Trim the 1/5th doily that is hanging over so the doily is flush with the right side of the card.


Now for some simple finishing touches....

22) Die cut a pennant out of the same pink cardstock as the cardbase.
23) Stamp sentiment onto the pink pennant.
24) Tape the stamped pennant in the very bottom of the doily on card, tucking the right side under the doily and the left side on top of the doily.
25) Glue coordinating flowers around the right side of the pennant.
26) Give card to someone for Easter and watch them smile!


Couture Creations Supplies:
Doily Dies Fantasia Collection: Dazling
Cultivated Embossing Folder
Double Sided Tape

Core'dinations Supplies:
Core Essentails Dark Collection 12" x 12"
Vintage Collection 6" x 6"
Sand It Gadget
Dusty Buddy

Other Supplies:
Ranger VersaMark & Archival Ink
Martha Steward Coarse Glitter
Stampendous Pearl Embossing Powder
Gel-A-Tins Stamps
Wishing much luck to those in Round 2 of Couture Creations DT Auditions!!! 

I hope you enjoyed a bit of early Easter! 
~Kate

Tuesday, February 18, 2014

She's 15 Today!

It is hard to believe that my fiesty, funny, beautiful and loyal Lily girl is 15 today! I am super proud of the wonderful young woman she is becoming.  She marches to her own beat and will happily smile at everyone.  She is social and sporty.  She is a movie and music and social media addict.  She is awesome! 

The other day she had her girlfriend take a poloroid of her.  This is what I found on my camera....


I made Lily a shaker birthday card inspired by Aimes.


It has been a long time since I made a shaker box, so this one is a little rough.  I am going to work on my design and will post a tutorial at some point.  Seems like everyone does these differently! 


Supplies:
Core'dinations Cardstock
October Afternoon Paper & Flags
American Crafts Thickers
Stampendous Shaved Ice
Couture Creations Double-Sided Tape
Helmar Zapdots

Happy Birthday Lily!!!
Love, Mom

Friday, February 14, 2014

Valentine's Love!

Happy Valentine's Day to all!  While I do believe we should celebrate love every day of the year, it is nice to use Valentine's Day as an excuse to leave homemade cards and chocolates for the ones I love.

I already shared the Valentine's card I made for Scott here.  Today I am sharing the simply sweet Valentine I left for my Lily girl.


The card is made with all Core'dinations Cardstock. The smooth white is the fabulous new 110lb paper that they are releasing.  Seriously the best stamping cardstock!  This sentiment, stamp by Unity Stamp Co, was always said with a goodnight kiss each night when my girls were young. I will still often say it to Lily.

Supplies:
Core'dinations Cardstock
Unity Stamp Co.
Momento Ink
Want2Scrap Bling
Studio Calico Wood Veneers


Tuesday, February 4, 2014

Hello World

So far this year I have enjoyed the arrival of two sweet baby boys into this world.  Well, the first really wasn't this year, he was born on New Year's Eve to my sister, Kerry, and her husband.  Sandy (my other sister) and I just got back from a trip to Arizona to meet Quinten!


Kerry asked me to take some family pictures of them while we were there.  I am no professional photographer!  These are a couple of my fave shots of them.  Doesn't Quinten look like he is devising an evil plan in the top photo?


The second little guy we welcomed to the world this year is Grant.  His beautiful mama is one of my co-workers.  While I am not sharing any photos of him today, I will say that he is the sweetest little baby boy!  Here is the card I made for Grant's birth...


Supplies:
Basic Grey Paper & Stickers
Lawn Fawn Stamps
Glitz Stamps
Ranger Archival Ink

In a couple of weeks there is another little baby boy that will be joining our world and I just can't wait.  Seems like it is raining baby boys around here! 
~Kate